
Building My First Homelab Network: Powerline, pfSense, and Tailscale
If you read my last article, you would know that I have just recently built a server! However, before I ever really got going on my homelabbing, I realized that I needed to first figure out how to network the server. I had a few considerations.
1. I still live at home with my family, whatever I do on my homelab should not affect our home network. Meaning I want segmentation between my family and my own homelabs’ network.
2. I wanted to keep my server in my room, meaning all potential networking devices should also be in my room.
3. I wanted to be able to access my server remotely if needed.
With these considerations in mind, I went out thinking of how to build out my homelab’s network. Now, since this was my first time doing something like this, I didn’t plan out the entire network beforehand. Rather, I took it on a step by step basis.
Getting a LAN Connection
The first problem that I had to tackle was being sure that I could get a wired internet connection to my room. Proxmox (the hypervisor that my server is running on) requires a wired connection to run, at least for set-up.
The first solution would be to check for any ethernet wiring. I was silly and thought a keystone conveniently under my desk was an RJ-45 ethernet jack. After taking a closer look however, it became obvious that the jack was actually an RJ-11 jack, commonly used for telephone wires. I wasn’t planning on tearing the walls of my family’s home to install ethernet, so a direct ethernet connection was out of the window.
The second option that came to mind was utilizing MoCA (Multimedia over Coaxial Alliance). For many homes, if you go to your modem or internet box, you will find the connection from the wall is not an ethernet cable, but actually a coaxial cable. This is due to DOCSIS (Data Over Cable Service Interface Specification) which enables internet providers to provide high-bandwidth data over existing coaxial cable infrastructure that is utilized for cable television. Coaxial cables literally put the “cable” in “cable tv”. This also explains why companies like xfinity provide both television and internet service. The existence of DOCSIS isn’t a necessity to be able to utilize MoCA, say for instance if your home receives internet from fiber optic cables. Rather, DOCSIS is a great example to show that coaxial wiring can carry internet signals, which most modern homes are outfitted with for cable TV!
MoCA utilizes adapters to take the internet signal from your router/internet box, and transmit that signal over coaxial cables, terminating at another MoCA adapter, which you can then use to plug in another router or device. Essentially, it lets you use your coaxial cables as a LAN connection. At best, you can get up to a 2.5 gigabit speed using MoCA. Unfortunately, I realized that the coaxial wiring in my room did not match the coaxial port next to our internet box. So, I had to pivot. However, if you want to try MoCA for yourself, I used these adapters from goCOAX. If it doesn’t work for your house, thats okay! Just order through amazon and return them!
My last option was utilizing powerline adapters, I ordered two Netgear PLP2000s for about $40 total on eBay! Powerline works similarly to MoCA, in that you place an adapter by your internet box/modem, and then another where you want to receive the wired connection. However, powerline communicates through the electrical wiring in your home!!! Which is mindblowing. As a result however, powerline is susceptible to more interference from other devices that are on the same circuit as your adapter. Further, powerline adapters (while they advertise speeds of up to 2GB/s) top out at about 200 mb/s. Thankfully, powerline was able to work for me without a hitch! Even when other power-hungry devices were being used, it still maintained speed of about 100mb/s. If I were self-hosting services that could be a problem, but since at the moment I want to use Proxmox for simulated SOC environments, this is plenty! This is because the internal traffic inside the hypervisor is unaffected by the LAN connection speed.
Building a pfSense Router
So, now I have a LAN connection, but what do I connect it to? In order to segment given my considerations, I needed to first connect it to another router. I was initially thinking of getting a really cute and nifty travel router such as the GL.iNet Opal. After doing some research and asking around however, I decided to create my own router using pfSense. pfSense is an open-source firewall and router distribution that is free for community use, and it comes with an incredible amount of features for customization. pfSense automatically blocks cross-network traffic by default, effectively segmenting my network and my family’s.
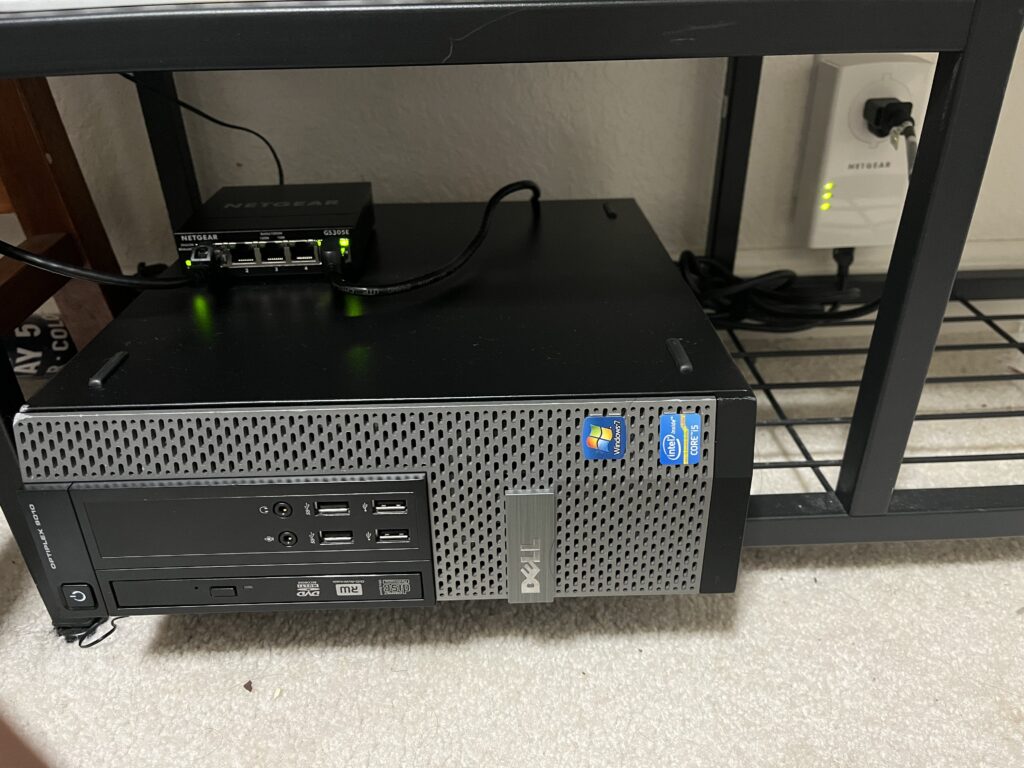
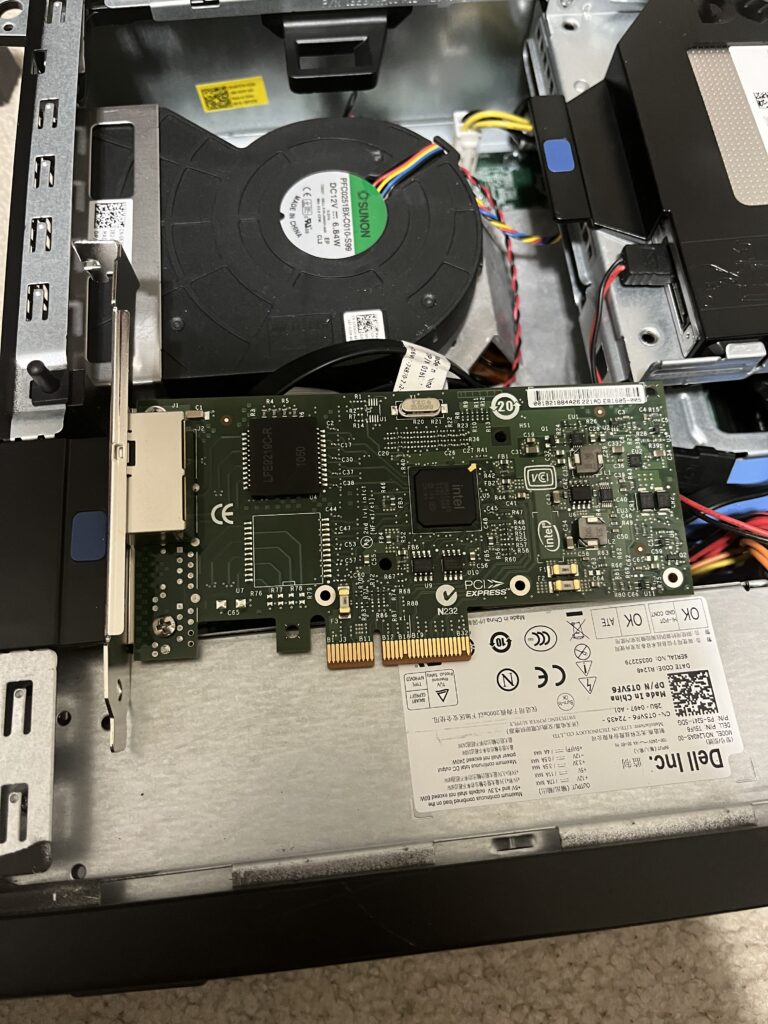
To build the router, I purchased an old dell optiplex 9010 off of eBay for about $50, a SATA SSD since my dell came without storage, and a NIC (Network Interface Card) for about $20, so that I could have two ports—one to connect to my powerline adapter (WAN) and the other to connect to my server (LAN). If you are thinking of doing the same, here is a great video from Linus Tech Tips, and another from NetworkChuck!
Setting up pfSense is relatively simple! Although I had frustrations with a faulty display-port cable. Also, be warned that for some reason despite the interfaces you set in the installation, pfSense may switch them around or choose to ignore you. So be sure to reconfigure through the terminal. I also decided that I wanted to be able to connect so I bought myself a 5-port managed switch for about $20 on Amazon!
Together, the router and the switch allowed me to FINALLY have a wired connection for my server. Silly enough however, I realized that I did not buy a long enough. Instead, all I had were short ethernet cables which I had purchased for connecting my powerline adapter, router, and swtich. So I literally had to lie on the floor next to my switch while I plugged my laptop into the switch with a short little ethernet cable. I realized that I should just set-up a VPN, so that I didn’t have to be lying on the floor until a longer ethernet cable came in.
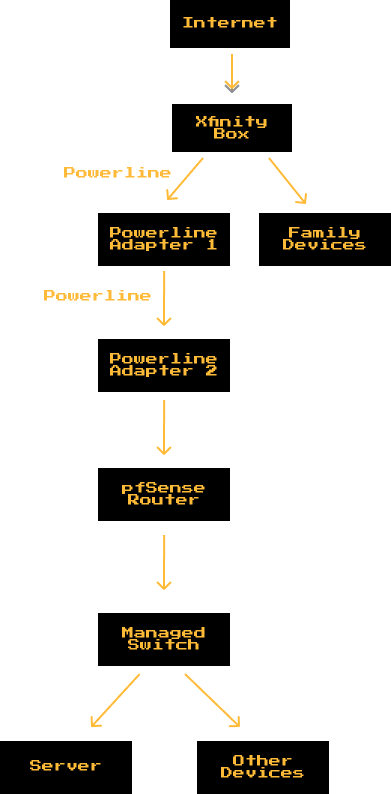
Putting all of this together, this is how my network came out:
A super-easy VPN – Tailscale
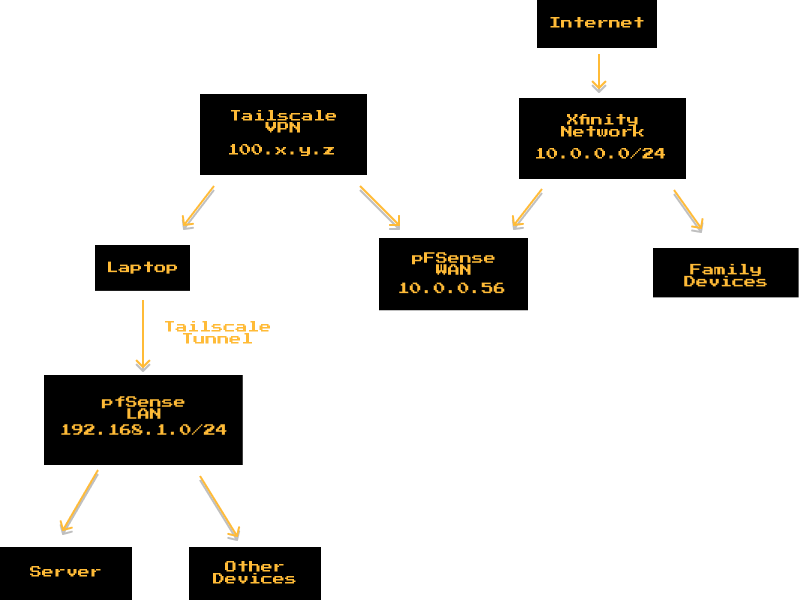
There are a lot of VPN solutions for homelabs that pfSense integrates well with, such as OpenVPN and WireGuard. However, after doing some research, I decided to go with Tailscale. Tailscale is an incredible product, that is free and laughably east to set-up. Unlike a traditional VPN, which relies on a centralized gateway to manage its clients (which often requires a lot of manual configuration). Tailscale leverages an overlay peer-to-peer mesh that automatically configures IPs and flows traffic, as well as handling access control. You can install Tailscale on multiple devices and log-in on your account, allowing you to connect all of the devices. For more information on tailscale, check-out this wonderful article written by their team.
pfSense has an easy to use Tailscale package, so I can install Tailscale directly onto my router. From there, if I want Tailscale to be able to access my network, I have to advertise my LAN route, and enable “Accept Subnet Routes” on Tailscale. From there, I just had to make sure that my laptop was connected to tailscale and I could.
This was so easy it felt like cheating, but Tailscale is really an incredible tool, and I certainly will be installing it onto my RaspberryPi when I figure out what I want to do with it!
Frankly, the hardest part of this process was dealing with my homelab acting iffy and pfSense randomly changing the interfaces on me following install. Overall, I am incredibly excited to keep messing around with this network but also really getting into some homelabbing. Stay tuned for my next post, it will either be about my first experiment on my homelab, or it will be an investigative piece!